Showing posts with label healthy. Show all posts
Tuesday, March 14, 2017
Soba Salad Bento
Hello! I know it's the middle of March, but it has been feeling like summer these past few days in the Bay Area. It was too hot in the kitchen to cook, believe it or not, so I decided to make a fresh cool salad for dinner. And tomorrow's lunch as well! Soba salad is convenient because everyone can use whatever toppings they choose: this one has snap peas, tomatoes, ham, egg, shiitake mushrooms, sesame seeds and green onion. The tsuyu goes into a separate small container on the side, but if you have a leakproof lunchbox you can drizzle it right on top ahead of time (or just omit it if desired). You can also sprinkle furikake as well. I hope this weather means the worst of the rainy winter season is over!
Tuesday, October 4, 2016
Chicken Katsu Onigirazu Bento
Working on improving my onigirazu technique; today I made oven-baked chicken katsu. There are lots of recipes out there describing this method - basically instead of deep-frying the panko-breaded chicken cutlets, you bake them in a 400F oven for 30 minutes or so. The key is to toast the panko on a frying pan first so that it turns a nice brown color, like how it would look if you had actually deep-fried the chicken. You really can't compare oven baked chicken katsu with real deep-fried chicken katsu, but I thought it came out okay. It will never be as crispy as deep-fried, but it definitely is less oily. And there is very little cleanup involved. I like that!
For this onigirazu I didn't use a mold; I simply placed some rice in the middle of a sheet of nori, then layered with shredded cabbage, a few slices of chicken katsu, a squirt of tonkatsu sauce, more rice, then folded up the four corners and cut in half. I like how it looks, but I can still add more filling. Next time that's what I'll do. Also, I'll fold a little more tightly. The learning experience continues. Also inside our LunchBot Clicks: strawberries, orange cherry tomato, steamed broccoli.
Labels:
broccoli,
cabbage,
chicken,
chicken katsu,
healthy,
home lunch,
homemade,
kids,
kids lunch,
musubi,
onigirazu,
onigiri,
packed lunch,
rice,
riceball,
strawberries,
sushi,
tonkatsu
Wednesday, October 14, 2015
Salmon Hash ECOlunchboxes Bento
Thursday, September 27, 2012
Gluten-Free Adventures: Sourdough!
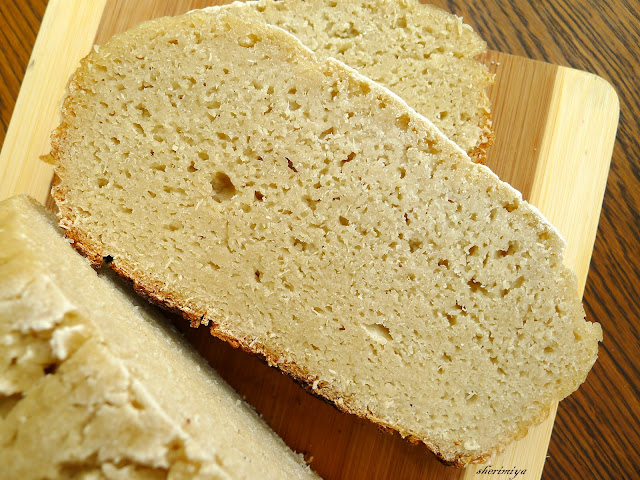
So I tried it. And I made a gluten-free sourdough. And, I liked it! Okay, it's not the sourdough you're thinking of; after all, there's no wheat in it, remember. But the flavor is sour, and the crust is chewy, and even though the crumb is dense rather than fluffy, I'm calling it sourdough. And I want to share it with you.
I read a whole bunch of books and articles and recipes on how to make a sourdough starter. And some on making gluten-free sourdough. But there aren't too many on making a gluten-free wild sourdough, so I kind of had to make it up as I went along.
First, I used a mixture of brown rice flour, sorghum flour and millet flour. I'm guessing you could use other types too, like garbanzo, quinoa, amaranth, white rice, etc. I measured 2T of flour and added 4T of filtered water. You'll want to make sure the water you use is not chlorinated (later I used bottled water, which also works). I mixed the flour and water together in a small glass cup. Some recipes call for pineapple juice instead of water, reasoning that the added sugar should speed things up. Some others toss in cabbage leaves or grapes to kick off the yeast culture, but I wanted to be purist. I left my cup alone, swirling it every now and then, whenever I walked by it. Honestly, I think I bothered it way too much that first day.
Not surprisingly, nothing whatsoever happened the first day that I could tell. The next day, I fed it with 2T more flour and 4T more water. On the 3rd day, I noticed small bubbles.
I wasn't sure if they were "real", but I was pretty excited. Over the next few hours, the bubbles became more pronounced. I'll show you how mine progressed:
By the 5th day, I was pretty sure I had a nice yeast culture going. And it was totally "wild" -- I didn't add any baker's yeast at all. You can also tell by the smell that something good is growing. It should smell yeasty/beery, like bread dough. Mine kind of smelled vinegary and acidic.
The length of time it will take for your culture to get to this point will vary depending on the temperature and humidity of your kitchen, and on your particular yeast and bacteria, of course. Once the culture starts going, it should not become contaminated. You'll get to know how fast and how often it needs to be fed. After a feeding, mine would bubble up a lot, then slow down and completely go flat after about 6 hours or so.
At the 6th day, I decided to grow it up to make a batch of dough. I added:
1/4 cup of flour + an equal weight of water every 12-24 hours.
At this point, you should be measuring ingredients by weight instead of volume, because this method is much more accurate, especially for baking. By day 10, I had enough for dough. After this point, I neglected to take process pictures (actually I was half afraid it wouldn't turn out -- but mainly I was so frazzled that I didn't have the presence of mind to stop and get the camera at each step. But if you click over to the recipe site I used, you'll see she posted some process photos).
I used the recipe I found at The Art of Gluten Free Baking. Now that I'm looking at it, it might seem overwhelming, especially if you haven't baked bread before. But trust me; I think it's probably easier than sourdough made with wheat flour, which you have to work, knead, and rise several times. Gluten-free dough doesn't need that much attention. Basically what you do is add some flour to your starter, some water, salt and sugar.
~~~~~~~~~~~~~~~~~~~~~~~~~~~~~~~~~~~~~~~~~~~~~~~~~~~~~~~~~~~~~~~~~~~~~~~~~~~~~~~~~
Here's what she writes as her method (if you click over, she also goes into greater detail about the process):
Sourdough Bread (Boule), Gluten-Free (edited 5/2/11 to correct flour cups measurement)
Special Equipment Needed
-kitchen scale (this recipe is best done by weight rather than volume–although I’ve included approximate cup measurements)
-4 qt Dutch oven w/a lid: Le Creuset, Mario Batali, Lodge, Dansk are all good brands
-a 4 qt bowl (one the same size as your Dutch oven)
-stand mixer (this will work best, but a hand mixer will do in a pinch)
-parchment paper and plastic wrap
-spray bottle with water for spraying top of the crust
-instant read thermometer is nice to double-check the interior temperature of finished bread, but you can do without it (they are cheap–get one!)
-kitchen scale (this recipe is best done by weight rather than volume–although I’ve included approximate cup measurements)
-4 qt Dutch oven w/a lid: Le Creuset, Mario Batali, Lodge, Dansk are all good brands
-a 4 qt bowl (one the same size as your Dutch oven)
-stand mixer (this will work best, but a hand mixer will do in a pinch)
-parchment paper and plastic wrap
-spray bottle with water for spraying top of the crust
-instant read thermometer is nice to double-check the interior temperature of finished bread, but you can do without it (they are cheap–get one!)
Ingredients (measurements are in weight ounces, not fluid ounces)
15 oz (about 3 C) flour (I use a combo of equal parts sorghum, brown rice, and tapioca) (100% BP)
30 oz (a bit less than 4 C) sourdough starter (200% BP)
approximately 6 oz (3/4 C) water (40% BP)
2 tsp salt (2% BP)
2 tsp xanthan gum (1% BP)
2 TBL granulated sugar (4% BP)
~~~~~~~~~~~~~~~~~~~~~~~~~~~~~~~~~~~~~~~~~~~~~~~~~~~~~~~~~~~~~~~~~~~~~~~~~~~~~~~~~
If you have a cast iron round French oven, that is ideal. I don't, so I used a Chinese clay pot. It's best if the rising bowl is the same size as the pot you plan to bake in. After the rise, lift out the risen dough by grasping the edges of the parchment paper. Be gentle. The dough should have doubled in size. Carefully place the dough into the preheated pot, cover with the lid and replace into the oven. Bake for 45 minutes covered, then remove the lid. If you have a thermometer, you can check to make sure the internal bread temperature is 200F. Take the pot out of the oven and cool on a rack for 15 minutes before removing the bread. When cool enough, pull the bread out using the parchment, peel off the paper, and admire. Slice and enjoy!
Labels:
baking,
bread,
gluten free,
gluten-free,
healthy,
homemade,
recipe,
sourdough,
starter,
wild
Monday, July 16, 2012
Red Drink!
You've heard all the buzz about green drinks, right? Well, green schmeen. Sure green is great (and here's my go-to green drink recipe), but you can make a delicious, healthy, refreshing drink of just about any color you desire. Here's one of my favorites: Red Drink! Actually it might be more of a hot pink drink, now that I look at it. Doesn't it look gorgeous? You might even be able to get your kids to suck it down; I know mine do. That beautiful scarlet hue is mainly due to beets. That's right, you heard me: beets! Raw beets are a good source of vitamin C, folate, and iron, and have a natural sweetness that make them a good base for a vegetable juice. Did you know that? I'll give you my recipe, but really you can alter the amounts and kinds of fruit however you choose. That's what I do. The intense red color comes from the raw red beet and red cabbage. And maybe from the berries too.
Sheri's Red Hot Pink Drink
1C almond milk
handful of red cabbage
[blend these ingredients first, to get better liquification]
1 small raw beet (or 1/2 medium beet), peeled and cut into 1 inch chunks (I chop it because I'm using a regular Oster blender. If you have a superblender then feel free to toss it in whole)
1 celery stalk
1 apple, peeled
1 small orange, peeled
1 banana
1C strawberries (or raspberries, or cherries, or other red fruit)
sunflower seeds
I blend the remaining ingredients in batches, since (as I said), I don't want to blow my blender's motor out.
This smoothie tastes fresh, sweet, yet vegetal. Trust me; it's good. Oh, and just a tip: don't wear white while you're making this one. Bottoms up!
Sheri's Red Hot Pink Drink
1C almond milk
handful of red cabbage
[blend these ingredients first, to get better liquification]
1 small raw beet (or 1/2 medium beet), peeled and cut into 1 inch chunks (I chop it because I'm using a regular Oster blender. If you have a superblender then feel free to toss it in whole)
1 celery stalk
1 apple, peeled
1 small orange, peeled
1 banana
1C strawberries (or raspberries, or cherries, or other red fruit)
sunflower seeds
I blend the remaining ingredients in batches, since (as I said), I don't want to blow my blender's motor out.
This smoothie tastes fresh, sweet, yet vegetal. Trust me; it's good. Oh, and just a tip: don't wear white while you're making this one. Bottoms up!
Labels:
beet,
drink,
healthy,
homemade delicious,
juice,
red,
red cabbage,
red drink,
smoothie,
strawberries,
vegetable
Tuesday, January 24, 2012
Green Drink!
I've been asked about my green drinks a few times, so I decided to write a bit about them. I just started making and drinking them for about 2 weeks, as one of my new year's challenges. So far, I LOVE them.
Seriously.
If you're not familiar with green drinks, do a google search. You'll find tons of recipes, articles and news tidbits, with lots of celebrity chefs and TV personalities touting them. I'll admit that I first heard of them from my mom, who started drinking them because she saw it on Dr. Oz. Once it registered, I found that many of my own friends are drinking these things too. The nice thing is that you don't need a special juicer or high-powered blender to make them. I only use an ordinary old blender with 2 speeds, and it works fine on the foods I've used so far. Also, you don't have to feel limited to an actual recipe -- use whatever you like! And experiment with flavor combinations. It's a lot of fun! I have a standard true-green drink that I like to make. I happen to like the pure green color, which is why I don't add other colors to this one. I also have a favorite red drink too (I will share this one later). If you mix all kinds of fruit and vegetables, you may end up with a brown drink -- which isn't bad, but it won't have the beautiful vibrant color that you see here. This is my recipe:
Sheri's Green Drink
1C almond milk
handful of spinach (maybe 1/2C packed)
handful of dandelion greens (or any other greens that you prefer, like chard, kale, lettuce, choy)
[blend these ingredients first, to get better liquification]
1 celery stalk
1/2 cucumber, peeled
1 apple, peeled
1 small orange, peeled
1/2 lime, peeled
1/2 avocado
1 inch ginger, grated
1T wheat germ (or flaxmeal)
Blend the remaining ingredients, in batches, so your blender won't blow its motor. If you have a high-powered blender, then just throw everything in at once.
This recipe makes about 4 cups. I drink about 2 and a half cups at midday, and save the rest in the fridge to share with my kids later. It tastes.. well, green, but with a sharp, tangy, fresh bite. If you prefer it sweeter, you can add fruit. Even a couple of strawberries will sweeten it up quite a bit, but then the color will change. I really like it to stay greeeeeen. And it might be too soon to tell, but my usual winter allergies seem to be less pronounced. This drink will give you energy, fortify you for the day ahead, fill you up, and make you invincible! Okay, I made up that last part. Maybe.
Seriously.
If you're not familiar with green drinks, do a google search. You'll find tons of recipes, articles and news tidbits, with lots of celebrity chefs and TV personalities touting them. I'll admit that I first heard of them from my mom, who started drinking them because she saw it on Dr. Oz. Once it registered, I found that many of my own friends are drinking these things too. The nice thing is that you don't need a special juicer or high-powered blender to make them. I only use an ordinary old blender with 2 speeds, and it works fine on the foods I've used so far. Also, you don't have to feel limited to an actual recipe -- use whatever you like! And experiment with flavor combinations. It's a lot of fun! I have a standard true-green drink that I like to make. I happen to like the pure green color, which is why I don't add other colors to this one. I also have a favorite red drink too (I will share this one later). If you mix all kinds of fruit and vegetables, you may end up with a brown drink -- which isn't bad, but it won't have the beautiful vibrant color that you see here. This is my recipe:
Sheri's Green Drink
1C almond milk
handful of spinach (maybe 1/2C packed)
handful of dandelion greens (or any other greens that you prefer, like chard, kale, lettuce, choy)
[blend these ingredients first, to get better liquification]
1 celery stalk
1/2 cucumber, peeled
1 apple, peeled
1 small orange, peeled
1/2 lime, peeled
1/2 avocado
1 inch ginger, grated
1T wheat germ (or flaxmeal)
Blend the remaining ingredients, in batches, so your blender won't blow its motor. If you have a high-powered blender, then just throw everything in at once.
This recipe makes about 4 cups. I drink about 2 and a half cups at midday, and save the rest in the fridge to share with my kids later. It tastes.. well, green, but with a sharp, tangy, fresh bite. If you prefer it sweeter, you can add fruit. Even a couple of strawberries will sweeten it up quite a bit, but then the color will change. I really like it to stay greeeeeen. And it might be too soon to tell, but my usual winter allergies seem to be less pronounced. This drink will give you energy, fortify you for the day ahead, fill you up, and make you invincible! Okay, I made up that last part. Maybe.
Labels:
almond milk,
apple,
avocado,
celery,
cucumber,
dandelion greens,
ginger,
green drink,
healthy,
juice,
lime,
orange,
recipe,
smoothie,
spinach,
wheat germ
Thursday, January 19, 2012
Chinese New Year Dragon Bento 2
Aaaand, it's another Chinese New Year bento! It's the Year of the Dragon - in case you forgot. Today I used my super cool slim stainless steel double box bento set (called "Zen" from Bento & Co) because I wanted to have a place for my dragon to rest until lunchtime. Each of these boxes is identical, and each has its own lid with gasket. When the two tiers are stacked and bound together with elastic, they are perfectly sealed. The left box contains salt grilled salmon with some lime wedges, roasted potatoes and kabocha strips (both sprinkled with garlic powder), and a bunch of grapes with a beautiful strawberry. The right box is layered with slices of cara cara oranges. I am super excited to see these fruit too! Now I am stocked up on blood and cara cara. They complement each other well -- the dark red blood oranges are tart and the pretty pink cara cara are sweeter. On top of those I lay my dragon made from cucumber, with quail egg and tomato eyes, tomato nostrils, and wispy green fire. I also cut some fierce fangs from the cucumber. His body is represented by the cucumber scales behind his head. Do you see him? I am trusting MisterMan with both tiers of this bento set for the first time, and I'm a little nervous! I hope he doesn't fling his bag around too much. RAWR!
Added to Allergy-Friendly Lunchbox Love.
Labels:
bento,
cara cara oranges,
charaben,
Chinese New Year,
cucumber,
cute,
dragon,
face,
grapes,
healthy,
kabocha,
kawaii,
kid,
potato,
quail egg,
salmon,
stainless steel,
strawberry,
tomato,
year of the dragon
Thursday, January 12, 2012
Vegetarian Hominy Bean Chili Bento
Guess what? We made it through a whole meatless week! Today's vegetarian chili is the 4th meatless bento in a row, and it's a thermal one. I've never tried this recipe before, and it has a different flavor than our usual meaty chili, with a ton of vegetables and beans such as black and kidney beans, lentils, carrots, sweet pepper, onion, zucchini, kale, celery, and hominy. It calls for a lot of chili powder, but also 1 ounce of bittersweet chocolate, which counters the spiciness enough that the kids could handle it. They loved it. I topped it with grated parmesan and fresh cilantro, and it was delicious. Even though it still hasn't been all that cold, it was nice to make a warm bento. It is winter, after all. The side box contains a selection of fruit: oranges, strawberry, blackberry, grapes, and a carrot. That's it for the week! We'll see if anyone asks for meat next week. ^_^
1 quart good quality vegetable broth
1 can (14.5 ounces) petite-diced tomatoes
1 generous Tb. vegetable oil
1 medium-large onion, cut into medium dice
1 bell pepper, cut into medium dice
1 carrot, sliced
1 zucchini, sliced
1 stalk celery, chopped
1/2 bunch kale, stem removed and leaves torn into small pieces
3 Tbs. chili powder
1 tsp. each ground cumin and oregano
2 cans (15.5 ounces each) drained black beans
2 cans (15.5 ounces each) drained hominy (I substituted kidney beans; you can use any beans)
1 cup lentils
3 large garlic cloves, minced
1 ounce bittersweet chocolate
1/4 of chopped fresh cilantro
Directions:
Heat oil in a pot over medium-high heat. Add onions and peppers; sauté until soft and golden brown, about 5 minutes. Add chili powder, cumin and oregano: sauté until fragrant, a minute or so. Add beans and hominy along with broth and tomatoes. Add the rest of the vegetables and lentils. Bring to a simmer, reduce heat to low and simmer, partially covered, until vegetables are tender and flavors have blended, about 40 minutes. Stir in garlic, chocolate and cilantro; simmer a couple of minutes to blend flavors. Turn off heat and let stand a few minutes if there's time. Adjust seasonings and serve.
Added to Allergy-Friendly Lunchbox.
Black Bean Hominy Chili
(adapted from Pam Anderson's recipe)
Ingredients:1 quart good quality vegetable broth
1 can (14.5 ounces) petite-diced tomatoes
1 generous Tb. vegetable oil
1 medium-large onion, cut into medium dice
1 bell pepper, cut into medium dice
1 carrot, sliced
1 zucchini, sliced
1 stalk celery, chopped
1/2 bunch kale, stem removed and leaves torn into small pieces
3 Tbs. chili powder
1 tsp. each ground cumin and oregano
2 cans (15.5 ounces each) drained black beans
2 cans (15.5 ounces each) drained hominy (I substituted kidney beans; you can use any beans)
1 cup lentils
3 large garlic cloves, minced
1 ounce bittersweet chocolate
1/4 of chopped fresh cilantro
Directions:
Heat oil in a pot over medium-high heat. Add onions and peppers; sauté until soft and golden brown, about 5 minutes. Add chili powder, cumin and oregano: sauté until fragrant, a minute or so. Add beans and hominy along with broth and tomatoes. Add the rest of the vegetables and lentils. Bring to a simmer, reduce heat to low and simmer, partially covered, until vegetables are tender and flavors have blended, about 40 minutes. Stir in garlic, chocolate and cilantro; simmer a couple of minutes to blend flavors. Turn off heat and let stand a few minutes if there's time. Adjust seasonings and serve.
Added to Allergy-Friendly Lunchbox.
Labels:
beans,
bento,
black beans,
blackberries,
carrot,
chili,
crispy kale,
grape,
healthy,
hominy,
kid,
meatless,
orange,
recipe,
stainless steel,
strawberries,
thermal,
vegetarian
Monday, January 11, 2010
Grilled Pork Banh Mi Bento
This post is part of a collective joint post extolling the virtues of Banh Mi as a bento item. My fellow bento bloggers and I wanted to show how this sandwich can be modified to fit nicely into just about any kind of nutritional lifestyle. We all make bento with different objectives, for people with different tastes and caloric requirements, yet we are all able to utilize this item effectively. There is a banh mi for everyone! Read more about how the delicious and versatile banh mi is playing a part in:
vegan/vegetarian adult bento for Debra at hapabento,
kid-friendly bento for Susan at Hawai'i's Bento Box Cookbook!
Banh Mi is a Vietnamese sandwich. It is widely available where I live (California) from ubiquitous Vietnamese restaurants and delis, in any number of varieties. They usually have some kind of meat filling (such as bbq or grilled chicken, pork or beef), which is accompanied by cucumbers, pickled carrots and daikon on a crunchy soft French sandwich roll. It's very delicious, fresh and light, and also very inexpensive. The kids really like it, so naturally it's a regular go-to lunch item in our house!
MisterMan is a typical, active first-grader, so I sent him to school with a bit over half of a sandwich. To the grilled pork and pickled veggies I added more cilantro as well as dandelion greens. He'll take awhile to crunch through this big sandwich, so in the side section I added just a few fruits: kumquats, cherries and checkered apple. Recently I've noticed that I have to take time consideration into account, as he's told me a couple times that he "runs out of time" to finish! I think maybe he wants to rush out to the playground with the other kids after lunch.
Did you notice my new sandwich bento box? Up to now I have always used my Keroppi basket bento box, which you may have seen before, in a past banh mi bento post. This one has a flip-top lid and an included side cup. It's just the right size for a sandwich and a side, or some musubi and a side. But best of all, since it's not a basket, I don't have to wrap in paper to prevent drying out. It's so cute! Here's how it looks all closed up:
Do you have a favorite banh mi? Tell me about it! Or, if you've never tried it, perhaps we have piqued your interest :)
Labels:
banh mi,
bento,
healthy,
sandwich,
vietnamese
Friday, December 11, 2009
Snowman Bento 'R Us!
I have finished up a week of Snowmen bento, as a kind of fun challenge for myself! I did a similar thing during Halloween, with jack o'lanterns. I think the results here were mixed, with some snowmen turning out cute and others, more - well - interesting. I'll post the series here, and you can decide for yourself! Which one do you like the best?
In this first one, I made TinySprite a snack bento featuring a snowman egg wearing a purple carrot scarf, and with nori facial details and a mini carrot stick nose!
Along with him, she gets a fruit selection of satsuma mandarin, strawberries, blackberries and raspberries. Also, some edamame skewers.
In this first one, I made TinySprite a snack bento featuring a snowman egg wearing a purple carrot scarf, and with nori facial details and a mini carrot stick nose!
Along with him, she gets a fruit selection of satsuma mandarin, strawberries, blackberries and raspberries. Also, some edamame skewers.
This guy is made of roasted baby potatoes, and goes with lemon garlic salmon and brussels sprouts, along with purple potato "chips" and starred fruits :)
This happy snowman is made of spinach ravioli with purple potato and purple carrot detail. There are those purple potato chips again!
Okay, the cauliflower snowman isn't quite as cute, but perhaps I can get some props for being adventurous? The fried egg sandwich and 4-bean salad was a hit, though!
The minestrone seemed to call out for a little riceball snowman.
I tried for a nashi (Japan pear) snowman this time, surrounded by fruit! He went with chicken and pickle wraps.
Are all these snowmen starting to make you feel like singing? Go ahead! I know you are, hapa bento ;)Happy winter!
("Frosty the snowman...")
Tuesday, December 1, 2009
Ninja In The Fruit Bento!
This snack bento is for my 2 year old TinySprite ~ a nori-wrapped hard-boiled egg ninja standing guard with his various weaponry. Watching over the satsuma mandarin, sugar plum, black grapes, strawberry and raspberry. Sword, dagger and throwing star shaped cucumber.
Inspired by fellow flickr bentoist MAHOUTAKE's egg man, and a challenge! Come eat the fruit! Dare you!
Little snack bento for toddler usuallly consists of fruit and cheese -- her favorite foods -- but I usually try to add some protein and veggies as well. Eggs and peanut butter are good stand-bys. She loves hard-boiled egg, which she will eat yolk and all, but for some reason she is not a fan of scrambled eggs or omelet, unfortunately. If your child is picky about certain foods, perhaps the stubborn one may come around if you present the food in a different form. Beans and peas are another specialty food; she prefers them deshelled. Don't bother to deshell them first; little kids love to "play" with their food and may even end up eating more if you let them pop the peas out themselves. My girl may be picky, but I can be sneaky too :)
Inspired by fellow flickr bentoist MAHOUTAKE's egg man, and a challenge! Come eat the fruit! Dare you!
Little snack bento for toddler usuallly consists of fruit and cheese -- her favorite foods -- but I usually try to add some protein and veggies as well. Eggs and peanut butter are good stand-bys. She loves hard-boiled egg, which she will eat yolk and all, but for some reason she is not a fan of scrambled eggs or omelet, unfortunately. If your child is picky about certain foods, perhaps the stubborn one may come around if you present the food in a different form. Beans and peas are another specialty food; she prefers them deshelled. Don't bother to deshell them first; little kids love to "play" with their food and may even end up eating more if you let them pop the peas out themselves. My girl may be picky, but I can be sneaky too :)
Monday, November 30, 2009
Three Flowers Bento
This round bento box always seems to call out for flowers, for some reason. It's also my favorite "box", because the food seems to look nice with minimal effort at arranging.
MisterMan has chicken lettuce wraps, red (Bhutanese) mixed rice with furikake, sweet potato maple leaves, purple and gold cauliflower, romanesco, yellow pear tomatoes. Fruit section has satsuma mandarins, strawberry, blackberry and raspberries. The lavender flowers are steamed purple potato with steamed purple carrot centers.
These purple potatoes seem to be different from the black-skinned purple potatoes I get from the farmers market in that the flesh is much lighter in color. Both types taste just the same as regular potatoes (to me), and perhaps next time I'll cook both together to compare. Maybe you have noticed that I like purple hues... if there is a purple food to be had, you can be sure I will be determined to obtain it :)
MisterMan has chicken lettuce wraps, red (Bhutanese) mixed rice with furikake, sweet potato maple leaves, purple and gold cauliflower, romanesco, yellow pear tomatoes. Fruit section has satsuma mandarins, strawberry, blackberry and raspberries. The lavender flowers are steamed purple potato with steamed purple carrot centers.
These purple potatoes seem to be different from the black-skinned purple potatoes I get from the farmers market in that the flesh is much lighter in color. Both types taste just the same as regular potatoes (to me), and perhaps next time I'll cook both together to compare. Maybe you have noticed that I like purple hues... if there is a purple food to be had, you can be sure I will be determined to obtain it :)
Labels:
bento,
black rice,
chicken,
flower,
fruits,
healthy,
kids,
lunch,
obento,
purple cauliflower,
purple potatoes,
round,
school,
tomatoes
Friday, November 27, 2009
Omelet Wrap Bento
Mushroom onion spinach omelet in whole wheat tortilla wrap with spring greens and avocado. Other veggies include: cucumber, sweet potato, purple and gold cauliflower, tomatoes, peapods, romanesco and satsumaimo. Fruits include tiny strawberries, blackberry, satsuma mandarin, and black grapes.
I was so happy the wrap fit so perfectly in this box, yay! Too bad the skewers had to come out, but the lid pressed down on the wraps very securely so they wouldn't unwrap before lunchtime :)
I always forget how useful and versatile eggs are. Besides hard-boiling and shaping into cute molds, or spreading as egg salad, they can be cooked into a healthy and filling omelet by adding your choice of veggies and / or meat. Here, I should have added tomatoes or red peppers for a nice color. Adding a tortilla and turning it into a wrap makes the omelet neat and easy to eat for little ones. I personally really like the wrap idea, as it can be used with lots of different fillings; cream cheese, smoked salmon, leftover chicken or other meats, cold cuts, even PB&J or other traditional sandwich spreads. The only limit is your imagination!
I was so happy the wrap fit so perfectly in this box, yay! Too bad the skewers had to come out, but the lid pressed down on the wraps very securely so they wouldn't unwrap before lunchtime :)
I always forget how useful and versatile eggs are. Besides hard-boiling and shaping into cute molds, or spreading as egg salad, they can be cooked into a healthy and filling omelet by adding your choice of veggies and / or meat. Here, I should have added tomatoes or red peppers for a nice color. Adding a tortilla and turning it into a wrap makes the omelet neat and easy to eat for little ones. I personally really like the wrap idea, as it can be used with lots of different fillings; cream cheese, smoked salmon, leftover chicken or other meats, cold cuts, even PB&J or other traditional sandwich spreads. The only limit is your imagination!
Saturday, November 21, 2009
Vinegar Chicken and Rice Bento
Vinegar Chicken and Rice Bento, originally uploaded by sherimiya ♥.
A simple yet brightly colorful bento lunch for my boy. Red wine vinegar chicken (recipe from maki at JustBento.com), 2-color carrot skewer, roasted tomato & artichoke with feta, brown rice makizushi with 2 color sweet potato detail, peapods and a tiny yellow pear garden tomato balloon. Fruit side has dinosaur egg plum, black grapes and blackberry.
If you ever find yourself out of ideas to beautify your bento, perhaps you can take a tip from me: sometimes just a small flower or leaf cutout is enough to draw the eye to a corner and bring a sense of nature and serenity. I will often not take the effort to cut any fancy characters or themes, due to lack of time or energy! But I think the bento still looks nice this way. I also like the contrast of an organized skewer of vegetables amidst the general randomness. You may notice that many of my bento look similar to this one. I think a simple presentation shows a calming kind of respect to the natural beauty of the food. Just my opinion.
Thursday, November 12, 2009
Bunny Pancakes Bento
Bunny Pancakes Bento, originally uploaded by sherimiya ♥.
MisterMan gets bunny-shaped zucchini-squash 10 grain pancakes, vinegar chicken, little rice "cupcake" with furikake and red pepper "cherry", colorful cauliflower and romanesco, peapods, cucumbers. Fruits include grapes (underneath), strawberries and tiny sugar plum.For the veggie pancakes, I used Bob's Red Mill 10-grain mix, and added wheat germ as well as quick-cook oats. I shredded one zucchini and one yellow squash, and added this to the mix along with an egg, 1T oil, and some milk. I use only enough milk to moisten the batter; this makes the pancakes fluffier and cuter... Also, easier to form into shapes :) I tried making bears too, but the bunnies looked better to me.
It's a veggie pancake, and I didn't serve it with syrup (or anything), but the kids still loved them, ha! For packing, I had to rearrange the ingredients slightly. But I think it still packed okay. ^_^
Wednesday, October 28, 2009
Jack-O-Lantern Musubi Bento
I have made lots of Halloween themed bento so far this season, and I think this one is my favorite. I don't usually make onigiri because my boy doesn't love rice all that much. I think he would rather have something more interesting! But I really wanted to try to make a pumpkin riceball. Now I see why so many people like to make riceball kyaraben; their chubby faces are so cute! So I am pleased with how the "carved" pumpkin turned out, and I think the little floral touches add some charm to this otherwise "plain" bento :)
MisterMan has fish / lettuce "tacos" with homemade tartar sauce in container underneath. Roasted supersweet mini red pepper and red cherry tomato add color. Carrot rice Jack-o-lantern. Satsumaimo and Okinawan sweet potato flowers.
Fruit side has late season peaches, blackberries (kind of tart!) and black grapes.
MisterMan has fish / lettuce "tacos" with homemade tartar sauce in container underneath. Roasted supersweet mini red pepper and red cherry tomato add color. Carrot rice Jack-o-lantern. Satsumaimo and Okinawan sweet potato flowers.
Fruit side has late season peaches, blackberries (kind of tart!) and black grapes.
Monday, October 26, 2009
A Bunch of Halloween Bento!
I have embarked on a mission to include a carved jack-o-lantern of some kind in each of my son's bento until Halloween! I know what you're thinking: huh? why?
Hmm. I don't know.
Because it's fun? For this one I made a cucumber witch too, with rotini pasta hair. The jack is made from an orange cherry tomato. There's also a skewer of multicolored carrots, and some watermelon radish.
Here I made chicken, and the jack is a tiny carrot disc. The fruit side has yellow plum and tiny sugar plum, with sweet kiwi and carrot/sweet potato detail.
This one had banh mi (Vietnamese sandwiches), and the side box has romanesco, fruits, and a plum carved jack-o-lantern!
And finally, a ravioli bento with sweet potato jack. Did it feel like Jack overload? Putting them all in a single post kind of makes me look obsessed...but really I'm just very festive. Really! Wait til you see the post of the bento from this coming week. Happy Halloween!
Monday, October 19, 2009
Sausage & Forbidden Rice Bento
Chicken sausage (all natural, TJ), Forbidden black / brown / white rice onigiri with radish and sweet potato detail, sesame spinach and garlic enoki. Maroon & yellow carrot skewer. Purple & yellow cauliflower, tomato, peapods.
Fruits: plum, strawberry, black grapes and golden raspberries.
This one is not so fancy, but has lots of interesting tastes :)
Fruits: plum, strawberry, black grapes and golden raspberries.
This one is not so fancy, but has lots of interesting tastes :)
Sunday, October 18, 2009
Skull Bento
Here is my FIRST contribution to the Halloween theme bento! (I will be posting many more :) A skull onigiri with purple carrot eyes, and Okinawan sweet potato and yellow beet detail. When MisterMan saw it, he said "Cool! You made a Tusken Raider!" WHAT?! *sigh*
Lemon crusted salmon (I did not make this, alas), romanesco, yellow and purple cauliflower, peapods, sweet potato, and radish atop arugula sprouts. Fruit box has little strawberries (they are getting very tiny these days), giant black grapes, plum, golden raspberries and blueberries.
We might also call this a Day of the Dead bento.... which it also might call to mind...
Lemon crusted salmon (I did not make this, alas), romanesco, yellow and purple cauliflower, peapods, sweet potato, and radish atop arugula sprouts. Fruit box has little strawberries (they are getting very tiny these days), giant black grapes, plum, golden raspberries and blueberries.
We might also call this a Day of the Dead bento.... which it also might call to mind...
Friday, October 16, 2009
Garlic Shrimp Bento
MisterMan has garlic shrimp, a superfast dish cooked in minutes on the stovetop in olive oil, garlic and lemon juice. Next to the shrimp he has romanesco, which I was so excited to find locally :) At the same market I also found arugula sprouts, and the two hearts are cut from yellow beets. Purple cauliflower, tomato/artichoke salad, peapods and purple/maroon carrot skewer. Fruit section includes strawberry, golden raspberries, dapple dandy plum grapes and blueberries.
This is one of my favorite bento boxes, because of its classic round shape, 3 divided sections, and transparent lid! All important aspects of a cool box to me. The topper would be if it had all those characteristics AND were made of stainless steel... but I am still on the lookout for such a thing. :)
Labels:
beets,
bento,
fruits,
garlic,
healthy,
kids,
lunch,
maroon carrots,
peapods,
purple carrots,
purple cauliflower,
romanesco,
round,
shrimp
Subscribe to:
Posts (Atom)


